

Wednesday, August 31, 2011


Tuesday, August 30, 2011


Monday, August 29, 2011
Jaimie Ramsey


Supplies:
Bazzill cardstock
Distress Ink
Kaisercraft Pearls
edge punch
Basic Grey paper
DCWV paper
Prima Flower
Button
Stampin Up! jumbo Stamp wheel
Double sided tape
Directions:
Cut a piece of Bazzill cardstock to 5 x 7 inches
* along one edge, use an edge punch to create a pattern
* using distress ink, stamp along one edge using the stamping wheel
* place 3 Kaisercraft rhinestones in the bottom left corner
* rip a piece of DCWV cardstock and adhere using double sided tape to the left side ofth page
* distress the edges of the photo using scissors or a distressing tool. Using double sided tape, adhere to the page over the bottom portion of the ripped paper (allowing some of the paper to show under the photo)
* Adgere a flower to the top left of the page
* Adhere a button as a flower centre
* Adhere a title to the top right of the page. You could hand write it, stamp it, emboss it, use stickers.. the possibilities are endless!
Bazzill cardstock
Distress Ink
Kaisercraft Pearls
edge punch
Basic Grey paper
DCWV paper
Prima Flower
Button
Stampi
Double sided tape
Directions:
Cut a piece of Bazzill cardstock to 5 x 7 inches
* along one edge, use an edge punch to create a pattern
* using distress ink, stamp along one edge using the stamping wheel
* place 3 Kaisercraft rhinestones in the bottom left corner
* rip a piece of DCWV cardstock and adhere using double sided tape to the left side ofth page
* distress the edges of the photo using scissors or a distressing tool. Using double sided tape, adhere to the page over the bottom portion of the ripped paper (allowing some of the paper to show under the photo)
* Adgere a flower to the top left of the page
* Adhere a button as a flower centre
* Adhere a title to the top right of the page. You could hand write it, stamp it, emboss it, use stickers.. the possibilities are endless!
Sunday, August 28, 2011
Emilia Stanojcic


Saturday, August 27, 2011
Sabine Schroll

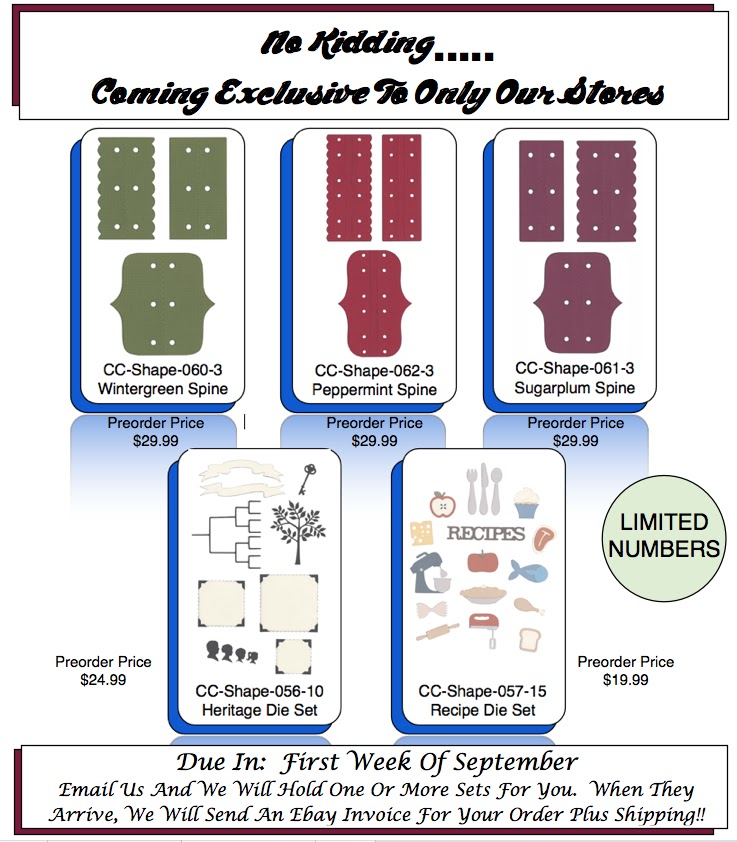
S5-043 Fleur De Lis Motifs
Shabby Shutters Distress Ink Pad
Crushed Olive Distress Ink Pad
L-CC-001 Nesting Circles
The background is decorated with the water technique. Distress ink stamp on an acrylic block, with water spray and press the glossy paper. Then let dry.
The edges around the card are wiped with Distress ink pad.
Friday, August 26, 2011

Thursday, August 25, 2011
Ute Thenert - Get Well Soon!

RS-0431 Flower (x)
RS-0429 Flower Pot
KS-0777 Bell
RS-0432 Vases
RS-0959 Vase
L-CC-006 Nesting Rectangles
CC-Shape-087-4 Nesting Flowers
Letterpress for the background
KS-0777 Bell
RS-0432 Vases
RS-0959 Vase
L-CC-006 Nesting Rectangles
CC-Shape-087-4 Nesting Flowers
Letterpress for the background
Making the flowers was very easy. I cut with the dies, layered together and mounted with foam pads. For the table I used the nesting rectangles. Vases, pots and the table were distressed with Ranger Distress Ink (walnut).
Wednesday, August 24, 2011
Mary Pfaff

Scissors Holder
Supplies:
Lifestyle Crafts ~ Label 1 & 2, C-0246-D1-2,D2-2
Georgia Pacific ~ White card stock
Misc. Purple card stock
Wescott Scissors & Holder
White Boa
Studio 18 ~ Rhinestones
Directions:
Cut purple card stock with D2-2 die.
Print “Scissors” with Harrington Font. Cut out with die D1-2. Layer together.
Hot glue Boa to Scissor holder flap. Glue tag to Boa. Add rhinestones.
Supplies:
Li
Geo
Misc. Purple card stock
Wescott Scissors & Holder
White Boa
Studio 18 ~ Rhinestones
Directi
Cut purple card stock with D2-2 die.
Print “Scissors” with Harrington Font. Cut out with die D1-2. Layer together.
Hot glue Boa to Scissor holder flap. Glue tag to Boa. Add rhinestones.
Monday, August 22, 2011
Emilia Stanojcic


Sunday, August 21, 2011


Tuesday, August 16, 2011

Monday, August 15, 2011

Sunday, August 14, 2011
Mary Pfaff

Lunch Money Coin Purse
Supplies:
Lifestyle Crafts ~ Special Delivery, SGS-10-CC-1, Scalloped Circle A2 Card Die
Georgia Pacific ~ White card stock
Misc. Patterned Paper
Prima – Flowers
Creative Impressions ~ Brad
Xyron, Hole Punch, Velcro strip, Cord
Directions:
Cut white card stock & patterned paper from die.
Run through Xyron. Attach together. Attach inside together along edge. Leaving top open. Fold down front. Add flowers with brad. Adhere front flap down.
Punch holes. Add cord. Place Velcro strip inside opening.
Supplies:
Lif
Georgia Pacific ~ White card stock
Misc. Patterned Paper
Prima – Flowers
Creative Impressions ~ Brad
Xyron, Hole Punch, Velcro strip, Cord
Directions:
Cu
Run through Xyron. Attach together. Attach inside together along edge. Leaving top open. Fold down front. Add flowers with brad. Adhere front flap down.
Punch holes. Add cord. Place Velcro strip inside opening.

Saturday, August 13, 2011


Friday, August 12, 2011
Back to School - Featured Designer Challenge by Ute Thenert

Here we have a card also using the photo of my mother. I took the basic card, stamped two corners with an old motif and layered with patterned paper. Then, I glued the ribbon. The photo was taken to the top with underlying brown crackle paper. Embellishments like the QuicKutz flower die complete the card.

Rev-0033 Daisy
Rev-0174 Flower
Flower #4 Make 3 Min Cards
CC-SHAPE-07 Flower Shape
I remembered the old photo of my mum and my own picture as beginner at school. So, it lies on hand to make a scrapbook page in Vintage Style.
For the embellishments I used these wonderful flower dies from Quickutz / Lifestyle Crafts.
Thursday, August 11, 2011

Wednesday, August 10, 2011
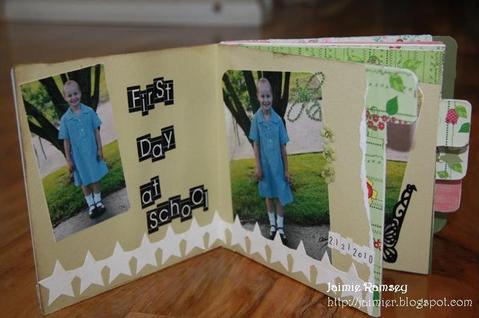
Back to School - Featured Designer Challenge by Jaimie Ramsey


Sunday, August 7, 2011

Back to School - Featured Designer Challenge by Ute Thenert


-006 Nesting Rectangles
Clear Art Stamps "Journal"
Clear Stamp ARTEMIO
Paper from My Minds eye -Damask
Saturday, August 6, 2011
Back to School - Featured Designer Challenge by Emilia Stanojcic

Quickutz / Lifestyle Crafts Award Die REV-0040
Scenic Route Paper Co ‘Sweet Linen’ (top half of bookmark) and ‘Appleton’ (bottom half of bookmark)
Kraft Cardstock from Aussie Scrap Source
Spinach Cardstock from Aussie Scrap Source
Stampin Up Whisper white ink
Grey felt for the ribbon (brand unknown)
I rounded the top 2 corners of Kraft and patterned paper, I then handstitched the Appleton paper with black ink, softened edges of the card and top part of award with Whisper white cardstock and my trusty dauber. Glued everything down except I used foam circles to raise the flower of the award.
The bookmark measures approximately 6cm x 20.5cm.
Thursday, August 4, 2011
Back to School - Featured Designer Challenge by Vicki Boddicker

Squares 01 Nest Squares
Spellbinders Apple die
White, Red, Green & Black card stock
MFT Back to School stamp set
Memento Black Ink & Copic markers
Tuesday, August 2, 2011
Back to School - Featured Designer Challenge by Mary Pfaff

Lunch Bag
Supplies:
Lifestyle Crafts ~ Journaling Block 1, REV-0228-1-2
Georgia Pacific ~ White card stock
Computer Font ~ Chalkboard, size 16 & 36
Laminating Name Tag
Fabric Flowers
Silver Brads
Recollections ~ Adhesive Faux Peals
1/8” White ribbon, Fabric bag
Directions:
Cut Journaling Block from white cardstock.
Print “This Lunch belongs to:” onto another piece of white cardstock. Cut out. Layer onto Journaling Block. Laminate. Punch holes in corners. Add ribbon for ties. Add pearls. Layer flowers. Insert brad into flowers then into corner holes.
Tie onto bag.
Lifes
Georgia Pacific ~ White card stock
Computer Font ~ Chalkboard, size 16 & 36
Laminating Name Tag
Fabric Flowers
Silver Brads
Recollections ~ Adhesive Faux Peals
1/8” White ribbon, Fabric bag
Directions:
Cut Journaling Block from white cardstock.
Print “This Lunch belongs to:” onto another piece of white cardstock. Cut out. Layer onto Journaling Block. Laminate. Punch holes in corners. Add ribbon for ties. Add pearls. Layer flowers. Insert brad into flowers then into corner holes.
Tie onto bag.
Subscribe to:
Posts (Atom)
2 black and white dp from a paper pad
Glack card stock
Lifestyle Crafts/Quickutz RS-0906 "9" Candle
Lifestyle Crafts/Quickutz RS-0907 "0" Candle
Spellbinders S4-324 Ribbon Banners