Friday, December 30, 2011

Mary Pfaff

Childs Bookmark
Supplies:
Kanban ~ Wobbler Jungle stamp set
StazOn ~ Jet Black Ink
Grafix ~ Shrink Film – Clear
Copic ~ C7, RV06, RV11, Y13
Misc: ¼” Hot Pink Robbon, 1/8” hole punch, 4mm Jump Rings
Directions:
Stamp image onto shrink plastic. Flip over and color in. Cut out. Punch hole.
Heat to shrink. Add two Jum Rings. Add Ribbon.

Wednesday, December 28, 2011

Ute Thenert

RS-0214 Quickutz Snowflake / Sizzix Die / Marianne Design Die Tag" Let it snow"

Sunday, December 25, 2011

Sabine Schroll


Quickutz/Lifestyle Crafts (DD0005) "Mittens"
This is an advent calendar that I've put together from matchboxes. Covered with cardstock and  stenciled. The numbers are written on the gloves of the Quickutz / Lifestyle Crafts (DD0005) "Mittens".
The name was Susie with the Quickutz / Lifestyle Crafts (4x8) "Chandelier" punched and glued Alphabet


Saturday, December 24, 2011

Mary Pfaff


Supplies:
Lifestyle Crafts ~ Nesting Bloom, DC0167, #1,2
Spellbinders ~ Classic Ovals SM & LG, S4-112 & S4-110, #3
Stampendous ~ Stamp
Tsukineko ~ Memento Tuxedo Black Ink
Stampin Up ~ Slit punch
Provo Craft ~ Cuttlebug Dots Embossing Folder
DCWV ~ Lt. Green/Pink Cardstock
Georgia Pacific ~ White Cardstock
Creative Impressions ~ Tiny Pearls, Sheer Green Swirl Ribbon
ZVA Creative ~ Pearls
Fabric Barn ~ Sheer White Ribbon
Misc: Lt Green Mini Brads, Mini Flower Punch, Tea Light
Directions:
Bag: Cut white cardstock @ 11” x 3 ½”. Score @ 4 3/8”, 6 5/8”. Decorate.

Congratulations!!! Marley van der Heijden


Wow!
  Congratulations! 
Our very own Marley van der Heijdenis has been published in Whimsy Stamps Inspirations Magazine Issue 5! 

Friday, December 23, 2011

Sabine Schroll

The subject has been one of the Quickutz / Lifestyle Crafts (L-002) "Nesting Squares" and punched gemattet. The fir trees (Quickutz / Lifestyle Crafts (JOLLY # 5) "Two Trees" Cookie Cutter Die) are translated up with 3D pads. The Christmas tree is one of the punching ball from the set Quickutz / Lifestyle Crafts (JOLLY # 10) "Nest Ornaments" The two Pc, came out of a circle on the Quickutz / Lifestyle Crafts (L-001) "Nesting Circles". As an attachment I took a thin line package

Tuesday, December 20, 2011

Sabine Schroll

Map lights.
I've used a Magnolia motif, which I cut contours exactly. It is fitted with 3D pads. The gloves and the star are also working with 3D pads. Everything else I've stuck with Glossy Accents.
Quickutz/Lifestyle Crafts (DD0005) "Mittens" X, Quickutz/Lifestyle Crafts (KS-0387) "Snowflake" Die X, Ranger/Inkssentials (17042) "Glossy Accents"

Sunday, December 18, 2011

Featured Designer Challenge by Ute Thenert

(KS-0777) Bell Die / (DC0174) "Nesting Frame 1 / Pearls / Christmas Flowers

Friday, December 16, 2011

Sabine Schroll

Quickutz/Lifestyle Crafts (Rev-0203) "Champagne"

Monday, December 12, 2011

Featured Designer Challenge by Ute Thenert

Quickutz Nesting Tags / Teresa Collins (BL1909) "Jamie's Gems" Blingage / Bentley Bear Chipboards / Ribbon / punch snowflakes

Saturday, December 10, 2011

Featured Designer Challenge - Mary Pfaff


Supplies:
Lifestyle Crafts ~ Nesting Stars (CC-SHAPE-3-021)
Georgia Pacific ~ White Card Stock
Tsukineko ~ Brilliance, Graphite Black Pigment Ink
Sparkle N Sprinkle ~ EP Black Detail Empossing Powder (EP171)
Three Bugs In A Rug ~ Studio G Series
Misc: Silver Glitter Paper, 26 GA 1/4lb. wire, 1 ¼” & 1 ½” Circle Punch, silver gift box, silver ribbon.
Directions:
Cut die # 1 six times from silver glitter paper. Cut die # 2, three times. Adhere to white card stock. Hand cut each out. Layer small star to center with mount foam. Adhere wire to backs of stars.
Stamp saying. Punch out. Layer onto larger punched silver circle.
Add ribbon to box. Hot glue wire stems to center of top of box. Tie bow. Glue over wire.

Thursday, December 8, 2011

Featured Designer Challenge by Sabine Schroll

The card has worked for a skit. The edges are all distressed with scissors and then wiped with Ranger / Tim Holtz "Crushed Olive" Distressed Ink Pad. The circles I've been using Quickutz / Lifestyle Crafts (L-001) "Nesting Circles" and stamped with Ranger / Inkssentials (17 042) "Glossy Accents" glued to the card. The number is the Quickutz / Lifestyle Crafts (4x8) "Chandelier" punched alphabet beglittert and applied with 3D pads on the card. The congratulatory text is from the set Quickutz / Lifestyle Crafts (JOLLY # 1) "Frames & Accessories" The 3 Pc. The rose petals and I've also beglittert from Quickutz / Lifestyle Crafts sin (RS-0440) "Leaves" Die

Sunday, December 4, 2011

Featured Designer Challenge by Marley van der Heijden

Quickutz/Lifestyle Crafts (Rev-0024) "Flourish" Die, Quickutz/Lifestyle Crafts (L-014) "Nesting Frames"

Thursday, December 1, 2011

Featured Designer Challenge by Ute Thenert


The crafting things you will need for this project are as follow:
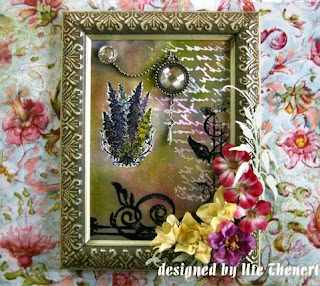
A white frame, 13x18cm
Paper My Mind´s Eye "Lost & Found", 12x12 inches (30, 5x30, 5cm),
Market Street "Lovely" French Stripe Paper (ITEM # LF1045)
LA BLANCHE (1070) 5.5x4 inches, Specialty Stamp Paper A6, Cardstock olive-green,
QuicKutz Die Damask, REV-0151, Marianne Design Creatable Die "floral" LR0151
Sizzix (657314) "Ornamental Elements" Letterpress Plate
Lifestyle Crafts (006) "Petite" Plate (Letterpress) & (005) "Damask" Plate (Letterpress)
Glitz Design Whatnot "dance in sunshine" (WN 3159) Victorian Woman
LA BLANCHE (1060) "Christmas Rose" Silicone Stamp
Memento Ink "Tuxedo Black"
Ranger Ink Blending Tool for 5 colors.  Ranger Distress Ink "dusty concord", "victorian velvet",
 "milled lavender", Ranger Distress Ink "tattered rose", and "pine needles"
Teresa Collins Blingage "Miranda´s Jewels"and "Ali´s Pins"
A piece of cotton fabric in violet, lilac or/and claret, needle, yarn, and
crocheted cotton ribbon in claret
Flowers and leaves, scissor, glue, foam pads


Step 1:
Stamp the motif "Christmas Rose" from La Blanche with Archival Ink Black on
the stamping paper and color it in carlet, lilac, tattered rose and the middle
in orange. It doesn´t matter which method you use, whether Aquarell colors
or Copic Markers. When done, cut out the motif with a little edge. Now glue
the crocheted claret cotton ribbon to the edge of the backside.
The ribbon has to be glued crimpy, then lay aside.


Step 2:
Take the scrapbooking paper and draw the cutout of the frame for a smaller
background paper. Stamp with the "small line" of Letterpress Plate" Petite" and
Distress Ink "dusty concord" to the middle of the cutout.  Above this line stamp
with the Sizzix  "Ornamental Elements" Letterpress Plate and "dusty concord" 2
times next to one another for making a border.  Then stamp the chair from the
Letterpress Plate "Damask" as well with Memento Ink "Tuxedo Black" to the left
side beneath the line, like shown in the picture. When all is done, color the whole
paper with Distress Inks "dusty concord", "Victorian velvet", "milled lavender" and
"tattered rose" a little at the edges and a little bit in the middle, but not too much.


Step 3:
Take the piece of cotton fabric, cut out a piece larger then 8cm x 21 cm.  You can
use a sewing machine or make it by hand with needle and yarn.  I prefer by hand
because the stitches are much finer.  From the remaining fabric you’ll make a valance
for the curtain.   For this you must frazzle one side of an 3cm x 8cm piece of fabric,  
fold it in the middle and glue it together. Now plug a pin from Teresa Collins "Ali´s Pin"
angular through the curtain and glue the flower from Teresa Collins "Miranda´s Jewels" on top. 


Step 4:
Flute the curtain and glue him at the right side and the top of the frame, but only
the edges, not the whole curtain. Also affix the valance on top of the frame. 
Mount the Victorian Woman from Glitz Design with 3D Foam Pads to the paper beside the curtain.
 
Step 5:
Apply the La Blanche Christmas Rose also with 3D Foam Pads  to the right
corner and stick 2 of "Ali´s Pins" angular under the motif through the ribbon.
Finally you can arrange some flowers  below in the left corner. Their colors must
be the same as the Distress Inks you used for the background paper.  For  the
leaves I made die cuts with the QuicKutz  "Damask" and the Marianne Design
Creatables "Floral" and edited a little bit with Distress Ink "pine needles".

Wednesday, November 30, 2011

Emilia Stanojcic

DC0024, REV-0089, CC-SHAPE-6-017

Monday, November 28, 2011

Sabine Schroll

Quickutz/Lifestyle Crafts (DC0182) "Nest Wavy Squares"
Quickutz/Lifestyle Crafts (RS-0656) "Kite"
Die X, Ranger/Inkssentials (17042) "Glossy Accents"
Ranger/ Tim Holtz "Dried Marigold and Forest Moss" Distressed Ink Pad

Saturday, November 26, 2011

Ute Thenert

(JOLLY #6) "String Of Lights"
(DC0177) "Nesting Frame 4"/
7 Gypsies (12435) "Assorted Buckles - Chocolate Brown"
Clear Art Stamps "Journal"
Reminisce Rub Ons "Thank You"

Friday, November 25, 2011

Sabine Schroll

Quickutz/Lifestyle Crafts (L-001) "Nesting Circles"
Quickutz/Lifestyle Crafts (RS-0656) "Kite" Die
Ranger/ Tim Holtz "Frayed burlap" Distressed Ink Pad
Ranger/Inkssentials (17042) "Glossy Accents"

Thursday, November 24, 2011

Wendy Mind

I was commissioned by a friend to make a baby boy card for her friend. I used the Nesting Lace Circle dies from Lifestyle Crafts for the base card (these dies are fab). I also got chance to use their bunny too. He has a very soft tummy, feet and ears!

Dies used to create this project:
Lifestyle Crafts Nesting Lace circles (DC0155), Easter Bunny (DR0056), Nesting Frame Die 3 (DC0176), Tiki Alphabet (DA0152)

Tuesday, November 22, 2011

Emilia Stanojcic

Nesting Rectangles L-CC-006, Disco Alphabet DISCO-14, Wave Edges CC-BDR-063

Sunday, November 20, 2011

Sabine Schroll

Quickutz/Lifestyle Crafts (DC0182) Wavy Squares
Quickutz/Lifestyle Crafts (RS-0656) Kite
Ranger/Inkssentials (17042)
Glossy Accents
Ranger/ Tim Holtz Dried Marigold and Forest Moss
Distressed Ink Pad

Thursday, November 17, 2011

Wednesday, November 16, 2011

Ute Thenert - LaBlanche/Fingerhut


Permalink
Teresa Collins (BL1913)
"Miranda's Jewels" Blingage
Teresa Collins (BL1905) "Taylor's Clips" Blingage
La Blanche Silicone Stamp – Fingerhut
Provo craft Embossing Folder – Texture
Marianne Design Dies
Corner Trellis Letterpress Plate Sizzix #657072
Ranger Inks
Embossing Powder Clear + black
Flowers

Monday, November 14, 2011

Mary Pfaff - LaBlanche/Kissing

Supplies:
LaBlanche ~ Kissing LV Stamp, Specialty Paper
Stampin’ Up ~ Script stamp, colored pencils
Ranger ~ Archival Ink, Jet Black Ink, Tim Holtz Distress Ink: Weathered Wood, Faded Jeans, Forest Moss, Scattered Straw, Tea Die, Vintage Photo
Top Boss ~ Embossong Pad
Stampendous ~ Clear Embossing Powder
Leaves, Pine Cones, White Daisy, Green Floral wire. Popsicle Stick, Wood Frame, Hot Glue
Directions:
Stamp image. Color in with Distress inks. Highlight colors with colored pencils. Stamp “Script” stamp with clear embossing pad, add powder. Heat. Ink over entire image. Tear edges. Ink. Rub embossing pad over edges, add powder. Heat. Curl two corners. Hot glue popsicle stick to right bottom corner at a slight angle. Add picture to stick with adhesive. Take daisy flower apart. Ink both petals. Hot glue leaves, pine cones, flower petals and curled wire to corner.

Sunday, November 13, 2011

Christmas - Featured Designer Challenge by Sabine Schroll


Quickutz/Lifestyle Crafts (Rev-0076) "Stocking" Die
Quickutz/Lifestyle Crafts (JOLLY #9) "Holly" Cookie Cutter Die

Saturday, November 12, 2011

Christmas - Featured Designer Challenge by Jaimie Ramsey

I thought I would do something different, and make a Christmas hairpiece - as I have a function at the races coming up for work and had nothing to wear in my hair!

I used:
Brown mesh ribbon
Large Bella burgundy flower
Prima white flowers / branch (x 2)
Green Tara leaves (x 2)
Prima flower Danseur Basque
Teresa Collins Blingage Taylor
Hair clip

Thursday, November 10, 2011

Christmas - Featured Designer Challenge by Sabine Schroll

Quickutz/Lifestyle Crafts (L-001) "Nesting Circles"
Quickutz/Lifestyle Crafts (JOLLY #9) "Holly" Cookie Cutter Die
Quickutz/Lifestyle Crafts (KS-0777) "Bell" Die
Ranger/ Tim Holtz "Weathered Wood" Distressed Ink Pad
Ranger/Inkssentials (17042) "Glossy Accents" 2 oz.
Tattered Angels Glimmer Mist "Forest Green" 2 oz.

Monday, November 7, 2011

Christmas - Featured Designer Challenge by Ute Thenert

Oh, how I love to make Christmas Cards with all these shimmering and glittering papers. I took different green tones of papers for the fir trees.  I used the Cookie Cutter Tree Dies from QuicKutz for the smaller card.  And, naturally a little angel must not be missing.

(JOLLY #5) Two Trees
(BIN #3) Tree Belt Loop
(BIN #4) Tree
Cookie Cutter - Love Shape-04
Martha Stewart Border Punch "Stars"

Sunday, November 6, 2011

Christmas - Featured Designer Challenge by Emilia Stanojcic

Matchbox, nesting scallop circles, nesting ornaments, santa's workshop alphabet

Friday, November 4, 2011

Christmas - Featured Designer Challenge by Jaimie Ramsey

Clear glass lolly jar
Black Kaiser craft rhinestones
Black looped ribbon
Red (thin) ribbon
Double sided tape
Red glitter letters "JAFFA" (An Australian confectionery - chocolate on the inside and a chocolate orange candy shell on the outside, commonly eaten at the movie theatre)
Kaiser craft red flowers (various sizes)
Kaiser craft black pearls
Kaiser craft red rhinestones
Kaiser craft fuzz felt - black swirls
Dimensional Magic (sealant for glitter letters)

Wednesday, November 2, 2011

Christmas - Featured Designer Challenge by Ute Thenert

Is it really that time again? It seems so..........
Now, here is my first Christmas Card. I used the typical phrase for Santa from Quickutz, Jolly #7 HoHoHo .The snowflakes were made with the (snowflake die RS-0386) also from Quickutz. Only a basis card, a little piece of patterned cotton and the Santa Motif Stamp, that´s it.
(JOLLY #7) "HO HO HO HO"
Snowflake die RS-0386
Teresa Collins (BL1909)
"Jamie's Gems" Blingage


Tuesday, November 1, 2011

Christmas - Featured Designer Challenge by Wendy Mind

3D Advent Tree Calendar Instructions


Products used
Quickutz / Lifestyle Crafts
-          Matchbox Die (L-CC-020)
-          Nesting Frames #3 (DC0176)
-          Chandelier 4 X 8 Alphabet

EK Success Circle Punch
Bazzill Bling in sparkle, infatuation, in the pink flat broke and glass slipper 
Silver Mirror Card 


Using the Matchbox Die cut out 24 boxes in the desired colors and assemble. You should have 2 parts to each matchbox, the outer casing and the inside box.


With the inside box part of the matchbox, punch out a semi-circle in the front so that the drawers are easy to open.


Cut out 24 of the 2nd smallest nesting frames and attach to the front of the match boxes.
Cut out the numbers 1 to 24 in the silver mirror card and attach to the nesting frame on the front on the boxes.


Insert the inside boxes into each of the outer casings and your advent tree is complete